Sunday, 27 May 2012
Sunday, 20 May 2012
More rust removal
As the title says, more rust removal from inside the chassis spine this week so no pictures. Same technique as described in my previous post. I've probably still got a couple of sessions of this to go before I'm ready to weld the cover tabs in place.
Sunday, 13 May 2012
Getting rid of the last of the rust
I've now got a couple of sessions of cleaning off the last of the rust. This is inside the chassis spine and concentrated on the lower panel...so the remainder of the original panel where I now have two covers.
No pictures this week as getting shots of rust in this area is difficult and not that interesting.
To get rid of the corrosion I'm using the trusty wire brush on an angel grinder which just about goes up inside the tunnel but is tricky to use as it can catch quite easily. I also have a small wire brush for use with an air drill to get into the bits not accessible with the angle grinder. Lastly I'm using an old screwdriver to clean the seam joints.
Once the loose rust is removed I give it all a blow through and wipe down. Next I use a product from POR 15 called Prep and Ready. It's a liquid that is sprayed onto the rusty areas. It eats the last of the rust away and etches the metal, leaving a zinc phostphate coating. This takes a while to do it's job and requires agitating with a brush every 30 minutes or so. It's good stuff!
Finally once any remnants of the Prep and Ready are rinsed away and the area dried thoroughly it's primed as I have done with the rest of the chassis spine.
Monday, 7 May 2012
Marking up for the cover tabs
This week I'm marking up in preparation to weld in the tabs that will hold the covers.
First up is to mark and drill the covers for the Camploc fasteners.
With this done I attached the tabs to the covers to find out where on the chassis spine they will finally be located.


This was then marked on the spine.

For the rear most cover, the back two tabs needed to be angled.

Final marking of the chassis spine for both covers.


Then the spine was drilled. I decided to use three plug welds per tab.


Sunday, 29 April 2012
Fabricating the cover mounts
This week is about making the tabs for the cover mounts.
Started off with some Camloc products. I thought I'd need seven but, after having ordered them, I changed my mind about where to locate them. I also ordered the type that you use a flat blade screwdriver with but again, after having received and tried them I have decided to go for the cross head type (which are now on order).

First job was to make a card template for the tabs.

Here they are marked up and cut out.

...and with the holes for the Camloc fasteners. After I took this picture and tried a few tabs in place I also altered the design slightly, making them a bit narrower, so they fit better.

Sunday, 22 April 2012
Finishing the second cover
With the lip panel made up it was time to trim the centre, in the same way as I did with the first cover.

Just making sure everything lines up correctly and so that the panel ribs underneath could also be marked out...

Trimmed to allow for the ribbing...

Tack welded in position.

...and final welding. In this picture the lip panel is still flat so does not follow the contours of the chassis spine.

Here the lip panel has been dressed into shape around the chassis spine.

...and some primer to keep the rust at bay.

Sunday, 15 April 2012
Trimming the cover and fabricating the lip
Cover is finally trimmed to size. This was done by removing very small amounts of material then "trying for size" a number of times. Because the shape is curved this took some time to get right.

Using the card template from before, the pattern was transferred to sheet steel. Note the datum marks were also transferred.

This gave a panel size identical to the hole so I needed to add an edge to this.
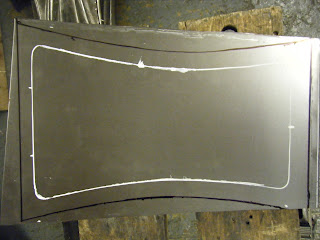

...and the edge joggled to give the lip that was needed.


Using the card template from before, the pattern was transferred to sheet steel. Note the datum marks were also transferred.

This gave a panel size identical to the hole so I needed to add an edge to this.

The final panel was then trimmed...

...and the edge joggled to give the lip that was needed.


Subscribe to:
Posts (Atom)