You'll have noticed things have stalled for a bit. This is due to a number of reasons...work on the house (which we are having some problems with!), a tendon problem in my arm and not least the Christmas holidays!
I hope to be back in action soon with much more regular updates.
PiL's VW- The building of a Beetle race car
This is the build of my replacement race car. I crashed in the original car after a blown rear tyre and just two (and a half!) runs in it. I hope to update weekly even if I've only made a small amount of progress. Drop back and see how it's going.
Sunday, 6 January 2013
Monday, 12 November 2012
New Channel In
I had a bit of time off work so dedicated it to trying to make some progress. Here's how I did...
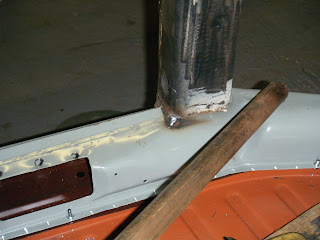
First I bolted a heater channel closing panel in place. This panel is being used as a dummy for the purpose of getting things together. I'm not over keen on the quality so will likely buy better before final welding.
Next the rear cross member was bolted in. At this stage I'm not sure whether the channel closing panel should sit on top of, or underneath the cross member but will find out before I get to the point where I can't change it.
Here I have the first of the genuine heater channels. The spot welds holding the heater pipe were drilled and the pipe removed as I have a plan that I would like to try if I am able (more as and when I get to that point). I'm not running any heating anyway so I don't cause a problem for myself in doing this at this point. It also gives me a slight weight loss advantage.
With the channel in place I found a conflict at the rear where the earlier quarter panel repairs had been done. This area was cut away to enable the rear quarter to sit on the channel properly.
Here is the channel in place. Note the rear cross member and front bulkhead panels located to ensure correct alignment of the heater channel.
Next task was to secure the heater channel to the closing panel and so install some of the missing rigidity. This was first done by drilling both panels and using cleco pins set every six inches.
Most of the pins were then replaced with 4mm set screws as I wanted to ensure the arrangement was as rigid as possible whilst carrying out the rest of the body panel repairs. The rear quarter was then tack welded in a couple of places to stop the body falling off.
The door gap was roughly set and the A pillar tacked into position. As repairs will be carried out on both A pillar and Rear quarter, fine adjustments will be made then.
Tuesday, 30 October 2012
Strengthening the body...or not (quite yet)
Now the body is on the chassis I want to get some strength back in it.
With no front clip or rear cross members the body is free to move around once the bracing I added is removed. Unfortunately I've found I can't fit the new rear cross members due to the repairs that had previously been done to the heater channels. I've also noticed that all the weight of the body is on the outside edge of the pan halves, pulling them downwards slightly.
All of this needs needs sorting out before anything is finally welded into place, and after a lot of thinking if decided that, to move forwards, I needs to go backwards slightly. The only way I can get the new rear cross members in place, and also take the load off the pan edges is to start by replacing the heater channels. I didn't want to take more strength out of the body at this stage but it seems to be the only way forwards. So I will remove and replace each heater channel, tacking them to the body and bolting them to the pan. This will add the strength and allow fitting of the rear cross members before I then tackle the rear quarter repairs...or at least that's the theory.
Door removed so I can see what I'm up against.
Heater channel opened up. Note the rust already taking hold inside the "new" pattern heater channel.
Front end opened up...
...and the centre section removed.
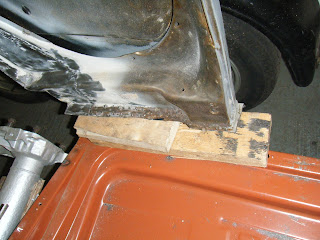
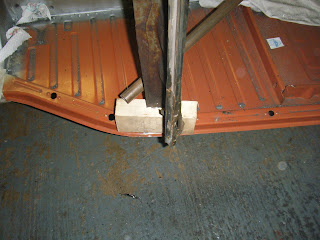
Using an angle grinder with a cutting disc the rest of the heater chanel was removed and wood blocks used to support the body. I'm glad I took this step as it confirms the previous repairs were not to the standard I want.
Sunday, 14 October 2012
At last!
After work, the house and a few other things taking priority I finally managed some time on the car today. Out came the and grinder and I finished separating the second inner rear quarter panel.
Sunday, 7 October 2012
Still no progress!
I've been in Portugal & Spain all week, which was planned. What wasn't planned was a minor disaster with the hot water boiler in the house!
Woke up to a cold house and a damp ceiling so had to get the leak sorted and the hot water back on. Wouldn't have minded if it was an old boiler but we only had it fitted 6 months ago. We've got a temporary repair done and an engineer coming some time tomorrow to fix it properly.
Woke up to a cold house and a damp ceiling so had to get the leak sorted and the hot water back on. Wouldn't have minded if it was an old boiler but we only had it fitted 6 months ago. We've got a temporary repair done and an engineer coming some time tomorrow to fix it properly.
Sunday, 30 September 2012
Sorry, nothing done this week...
...unfortunately work on the house took priority this week so nothing done on the car. Hopefully back at it next week!
Sunday, 23 September 2012
Bit more done....
...but no pictures today as drilling more spot welds isn't the most fantastic photo subject!
Today I set to work on the second used rear quarter, that I bought, to separate the inner panel. Lots of scraping of seam sealer followed by drilling of spot welds. Got a couple of hours in but didn't manage to complete it.
Today I set to work on the second used rear quarter, that I bought, to separate the inner panel. Lots of scraping of seam sealer followed by drilling of spot welds. Got a couple of hours in but didn't manage to complete it.
Subscribe to:
Comments (Atom)


